

meta data for this page
This is an old revision of the document!
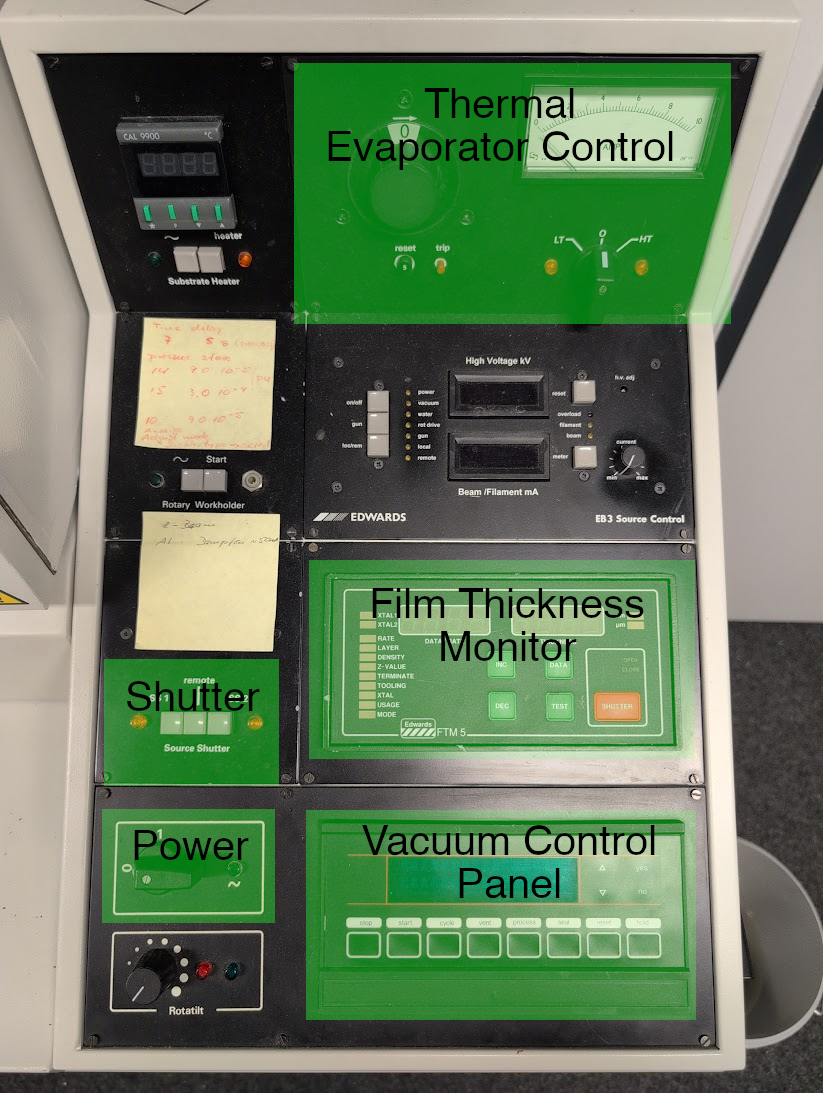
Edwards AUTO 306 Coating System

Multi-process PVD system consisting of two Edwards AUTO 306 coaters and a control cabinet.
Capabilities: Right unit: Thermal evaporation, e-beam. Left unit: sputter.
Status
Sputter:
Needs Argon and refurbishing / bringup.
Coater:
Thermal evaporation works, e-beam needs bringup. Film thickness monitor needs a new crystal.
Resources
- Techtree: PVD: Thermal Evaporation & PVD: Sputtering
Standard Operating Procedure
Currently written for the thermal evap unit, should be unified with the sputter unit as it is brought up.
Principles of operation
The thermal evaporation is a high vacuum system built around a roughing pump and a turbomolecular pump. The vacuum system is quite smart and automatic (hence the AUTO name), in that it performs its own sequencing of valves based on the current state of the system and user requests.
Assuming a cold start, the system will go through the following sequence:
- Power failure recovery (if cold)
- Backing: connects the roughing pump to the turbo, get it down to operating pressure
- Turbo start: starts up the turbo, wait for it to spin up.
Then, continuing (or picking up from the chamber having been vented by the user at a later stage):
- Roughing: connects the roughing pump to the chamber, bypassing the turbo, gets it down to a rough pressure to connect the turbo
- Pumping down: connects the roughing pump to the chamber, opens the high pressure valve between the turbo and the chamber
- Fine pumping: continuing above, but now without any timeout - it's just trying to do its best.
The user can request the following actions at various stages:
- Reset: in case of failure (timeout, power failure, etc.), acknowledge the fault
- Cycle: Perform the process above reaching an ultra high vacuum
- Process: Same as 'cycle', but when an ultimate pressure is reached the chamber seals (the high vacuum valve is closed) and the process can perform a plasma cleaning step
- Seal: Isolate the chamber from the rest of the system. Usually a prerequisite to then stop or vent the system.
- Stop: Perform a shutdown process: spin down the turbo and turn off the roughing pump.
- Vent: Isolate the chamber from the rest of the system and vent it to the atmosphere, allowing a sample to be placed/removed/etc.
In practice, we use the system by first getting it to a high vacuum (cycle), possibly sealing/venting before the high vacuum is achieved to place a sample, then vent, then cycle, then vent, etc.
Caution
- Wear nitrile gloves when operating inside the chamber.
- Be careful when reaching for parts of the chamber after thermal evaporation - they will be hot!
Startup Process
Starting from cold:
- Make sure the switches on the control panel of the unit are set to their off/default positions:
- Power switch: 0
- HT/0/LT: 0
- Knob next to HT/0/LT: 0
- Substrate heater power (~): not pressed
- Source shutter buttons: none pressed
- Electron beam power: not pressed
- Make sure the chamber of the coater is closed.
- Turn on the power switch to 'I' (on) on the AUFDAMPFANLAGE rack control unit. One or three indicators should light up above the switch indicating power to this part of the system.
- Turn on the power switch to '1' (on) on the control panel. The '~' indicator next to it should light up, and the FTM (film thickness monitor) and vacuum control panel should light up.
- The vacuum control panel should display a 'POWER FAIL' error. This is normal.
- Press 'reset' on the vacuum control panel. It should display 'TODOTODO' ('SEALED'?)
- Press 'cycle' on the vacuum control panel. The system will start to back the turbo and spin it up.
- Once the vacuum control panel shows 'TURBO START', turn on the cooling water feed to the coater.
- Press 'seal' and 'vent', wait for chamber to vent.
- Insert sample, and check that shutter actuates when 'SS1' is pressed. If not, manually actuate it a few times and then it should get unstuck.
- Press 'cycle' after inserting sample.
Plasma Cleaning
- Load sample
- Press 'process'.
- Wait until 'fine pumping' is reached (TODO: set thresholds correctly)
- Press 'seal'.
- Select the 'chamber' readout on the vacuum controller with the up/down arrows.
- Open the vent butterfly valve (below chamber), and then slowly open needle valve until pressure starts rising.
- Close valves when pressure reaches around 1e-1 mbar. If overshot, restart process.
- Set LT/0/HT selector to HT, slowly bring up power knob until plasma starts in the chamber and current flows.
- Tweak needle valve and power until a stable plasma is achieved that fills up as much of the chamber as possible.
- Manual recommends running plasma cleaning for 20 minutes for every loaded sample before coating it. No experiments have been performed to confirm whether this actually helps with coating.
Simple Coating
This procedure is still in progress, but roughly:
- Insert Al (eg. foil!) into the boat of the thermal evaporator.
- Place your sample.
- Cycle the system.
- Set the selector to 'LT', slowly crank the knob until you see the boat reach red hot.
- Slowly increase the knob until the Al melts.
- Decrease the knob back until red hot (around 5?).
- Press SS1 to open the shutter (not that it does much for evap).
- Start a timer, eg. 30 seconds.
- Press SS1 to close the shutter.
- Set knob to 0, set HT/0/LT selector to 0.
- Vent the system.
Shutdown Process
- Press 'seal' and then 'stop'.
- Wait for the roughing pump to stop and the turbo to start spinning down.
- Wait 30 minutes until turbo spins down.
- Stop water flow.
- Turn off power on control panel.
- Turn off power at rack unit.