

meta data for this page
Lab Log for the Zeiss DSM "Kevin"
This page is a lab notebook. It documents the work done in the lab and our thoughts, theories, and findings related to it. Everything you read here is work in progress and not final results. We believe it is best to have our lab notes out in the open, because it gives more detailed insight into what worked for us and what didn't. Of course you can also use this page to follow our progress!
Day 2026-07-18 (q3k, rahix)
For reference, this is the current sample configuration in the SEM:

Day 2026-07-16 (q3k, guest)
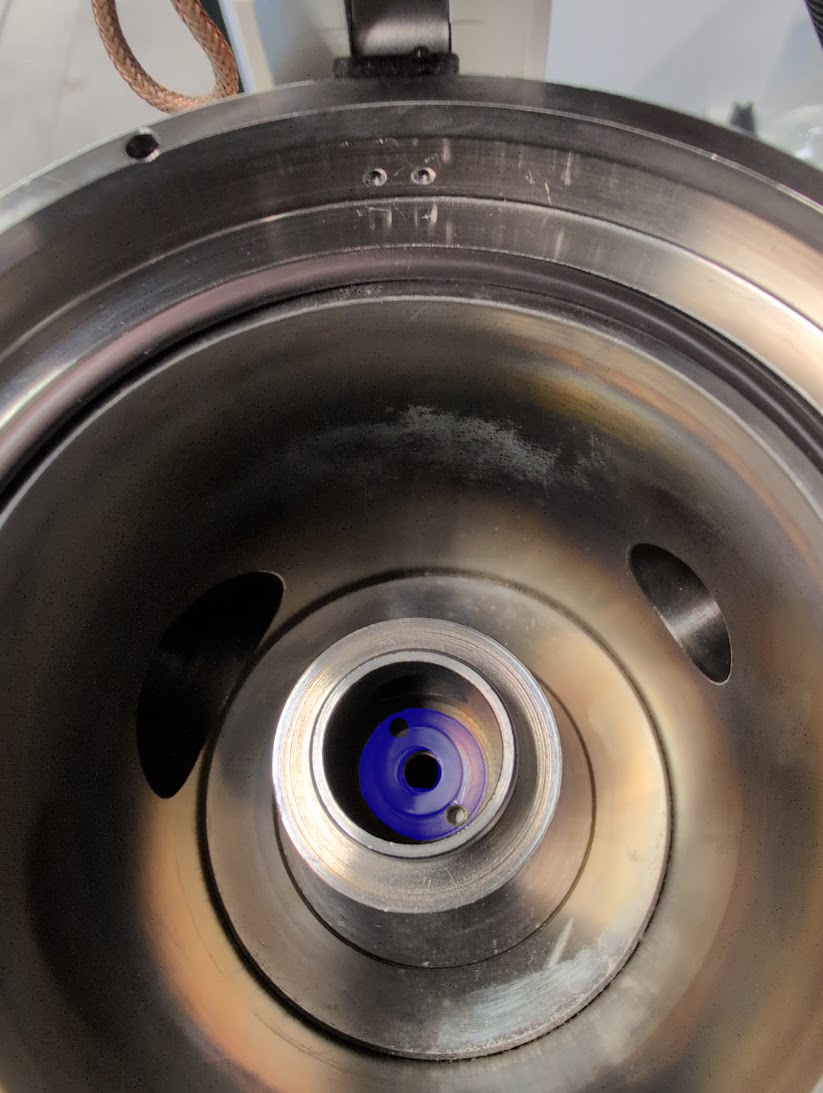
Finally replaced the o-ring. In the process, the interlock switch for the top of the column broke. It is jumpered out for now.
- Original switch: Honeywell 3SX1-T
- Possible replacement: OMRON J-7
Day 2026-07-11 (q3k, rahix)
Started work on designing a proper enclosure for the OBI.
Day 2026-07-10 (q3k)
Continued work on the OBI. Here's a picture acquired through it:

Day 2026-07-08 (q3k, hugo)
New tool worked to get the locknut out. O-ring indeed got destroyed; ordered replacements (it's a 6×2mm). In the meantime, sealed it up again and while not pumping down great, we can still get a good enough vacuum for imaging.
Installed the beam blanker:
![]()
It has an SMC connector, will need to get an appropriate cable.
Day 2026-07-05 (rahix, rob)
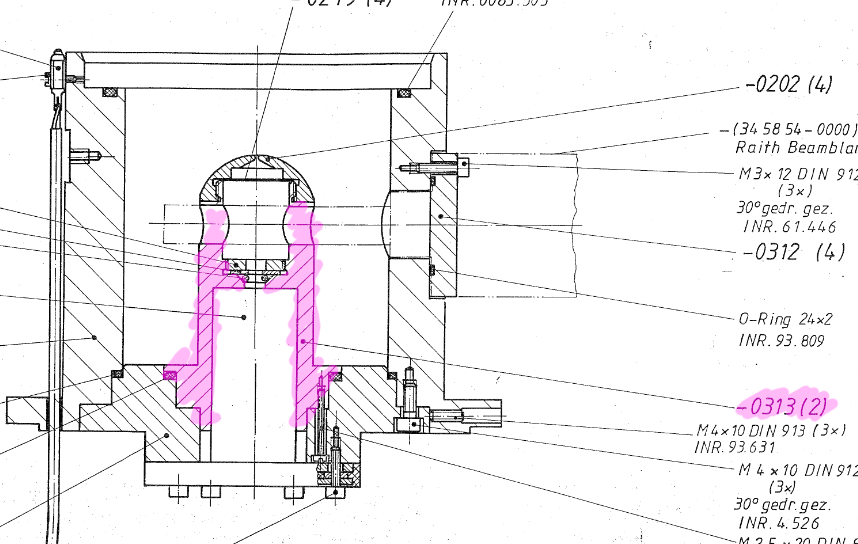
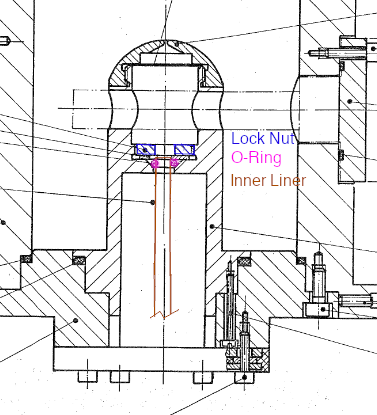
Next attempt at removing the lock nut that's hiding the broken o-ring.
During opening of the gun head, we found a washer beneath the liner tube. It is wrapped inside the aluminum foil labelled Anode, next to the anode head.
The first iteration of the 3d-printed tool broke, the lock nut is on there really tight.
Redesigned the locknut tool to hopefully take more torque. Printed the new tool, but didn't get to use it yet. The model is in misc/sem-anode-lock-ring-tool.FCStd. It is designed to take two M2x16 screws for engaging the lock nut.

Roughly reassembled the column (anode head, liner tube, and the washer are still outside). Pulled a rough vacuum to not leave the system under atmosphere.
Day 2026-07-03 (q3k, hugo)
Attempted to adjust the anode head to be able to fit the beam blanker. Part which needed to be rotated in purple.
[Documentation p. 174, 6.2 02-3 3]
This required disassembling the anode head - removing it from the column, which also meant removing the cathode head with its hinge, removing the cathode head interlock switch (soldered on) and disconnecting the beam aligner connector inside the column.
The anode part that was misaligned has been realigned by rotating it by 120 degrees.
Unfortunately after reassembly the column barely reaches minimum working vacuum. This is likely because of damage to an o-ring in the cathode head. When the head was re-attached, the sharp column tube that was affixed to the rest of the machine damaged the o-ring as it was being squeezed by a lock nut keeping it in place and sealed.
To do this a tool will need to be manufactured to undo the blue nut. Then the correct replacement o-ring will need to be ordered and replaced.
Day 2026-06-07 (q3k)
Hooked up the OBI (Open Beam Interface) to the DSM. Voltage on detector is very low (O(200mVpp)) and return time still needs to be implemented. The OBI wants ~5Vpp, so this is too low. Still managed to acquire first images.
Day 2026-04-09 (q3k, Rob, guest, leah)
Reconnected cooling system.
Replaced vacuum pump with Edwards pump from Wedel haul. Gets to a decent vacuum, but can't tell if there's still a leak in the column or whether it's outgassing after being at atmosphere for a while.
While imaging loud 'click' happened, image turned black and there's no filament current. Checking if it's a burned filament or something else.
Day 2026-03-01 (rahix)
Tried connecting FRONT, BACK1, and BACK2 all together using pneumatic T-couplers. It doesn't work, the weight of the column is too much off the side, meaning one bellow stays in contact with the bottom while the diagonally opposite one is at the top limit.
Reverted back to the previous state with three separate valves.
Day 2026-02-14 (rahix)
Fixed the very leaky tire valves of the isolation system. We now have proper pneumatic isolation valves on all three tubes instead. They are labelled now:

The back bellows are labelled BACK1 and BACK2 for clarity:

Updated the instructions here: setting_up_the_vibration_isolation
Day 2026-01-24 (q3k, rahix, rob, hugo)
Taught a few more members how to use the DSM. Started taking notes on the important facts and pictures of the relevant controls so we can create a wiki page with all the info.
Noticed that the tire valves for the vibration isolation are now all leaky so it's no longer possible to get the bellows pumped up enough. Ordered some more ball valves to mitigate it. But maybe a better solution is more urgent than we hoped…
Day 2025-10-?? (q3k, guest)
Cycling the DSM rapidly killed F5 (6.3A, slow blow). A 6.3A fast blow fuse from F6 was moved into F5, and a 5A fuse has been installed into F6 (as a bodge).
Day 2025-10-05 (implr, rahix, q3k)
Worked on replacing the annoyingly loud fan of the BIVAS with some gamer fans. Unfortunately, we only have 2 right now, but we need 3 (140mm fans, with RGB of course). Ordered another one.
Printed some brackets that will attach the fans to each other. We will need additional brackets to attach the fans to the rack in the future.
The 2 fans are temporarily mounted with zip-ties so we have some airflow at least.

Also, not driving the gamer lights yet. That still needs to be added!
Day 2025-08-23 (q3k, rahix, ln, rob, 2x guest)
Finally all the parts for the sketchy vibration isolation system are here. Installed the setup:
- Replaced the original air hoses for the 4 isolation bellows with new ø6mm hose (the transparent blue one).
- The setup is still the same: The front two bellows are connected with a tee, the back ones are individual.
- On the end of each of the 3 hoses, a tire valve is installed with an ungodly adapter mess: The tire valve has an NPT thread, screwed into an NPT to BSP adapter, screwed into a push-in fitting.
- A bike pump can now be used to inflate the bellows to raise the column into vibration isolation.
Unfortunately, one of the tire valves is broken and leaks quite heavily. Installed a ball valve in front of it as a countermeasure. Keep in mind to close it!!

When pumping up the bellows, they start moving at about 2.9 barg. Pump very slowly at that point because you only need a tiny amount of additional air to actually start moving. Always do the front bellows (the connector with the ball valve) first.
For comparison, took two pictures to compare no isolation (left) to isolation (right):


Amazing!